Docker Containers Pain Point
Docker Containers are ideal for running isolated processes, but the out-of-the-box network configuration leaves something to be desired. The docker daemon picks an unused address from the subnet attached to the docker bridge, and assigns it to the container. This could be a pain if you have hardcoded addresses in your various applications, or just want more flexible private communication between specific containers.
Pipework Introduction
Pipework is a script that lets you connect your containers together in “arbitrarily complex scenarios.” In practical terms it can create new OVS bridges, then add a new interface to a container, then attach said interface to that bridge, meaning containers get a “private” LAN on which to communicate with each other. It can also assign a physical interface to a container, if you have multiple network connections to your host.
As pipework is a shell script, installing is simple:
# Reccommended, but not required
sudo apt-get update && sudo apt-get install arping

sudo wget -O /usr/local/bin/pipework \
  https://raw.githubusercontent.com/jpetazzo/pipework/master/pipework
sudo chmod +x /usr/local/bin/pipework
Now let’s connect some containers. A good example would be a typical web stack, nginx, PHP and MySQL. Firstly, let’s start them up:
sudo docker run -d --name nginx
sudo docker run -d --name php php:fpm
sudo docker run -d --name mysql -e MYSQL_ROOT_PASSWORD=mysecretpassword mysql
Now we’ll use pipework to connect them:
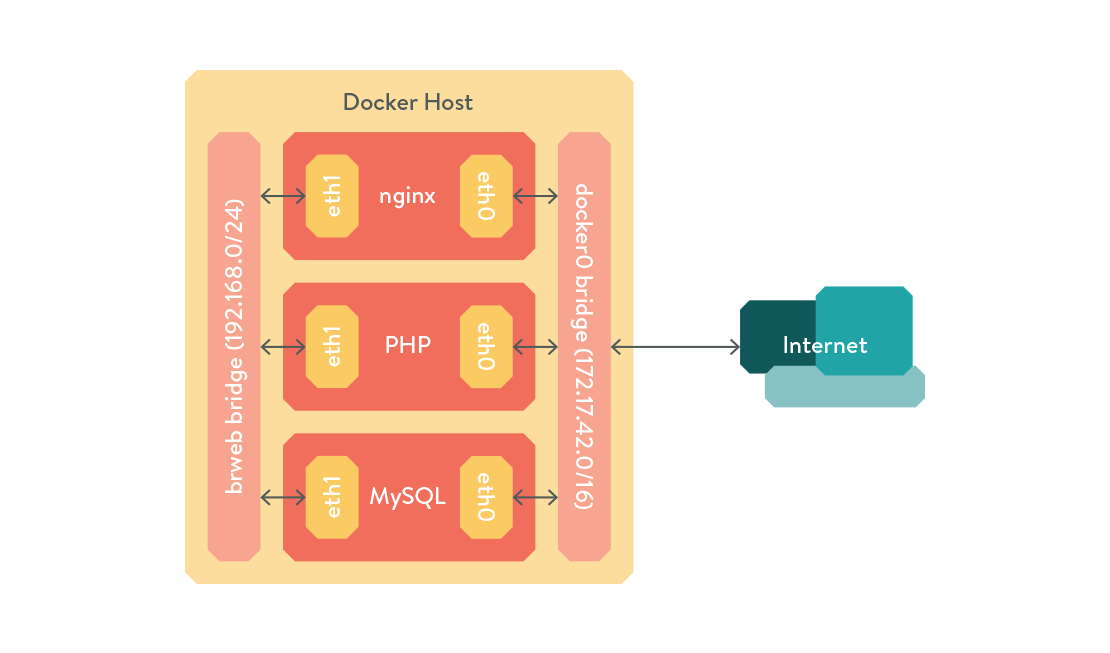
sudo pipework brweb nginx 192.168.0.1/24
This will create a new bridge called brweb on the Docker host, add an interface named eth1 to the container named
nginx, assign 192.168.0.1/24 to the interface, and connect the interface to brweb.
sudo pipework brweb php 192.168.0.2/24
sudo pipework brweb mysql 192.168.0.3/24
As the bridge already exists, these 2 commands will not create the bridge, but it will still add the interfaces, assign IPs and connect them to the bridge. After running the above 3 commands, the containers should all be connected and able to ping each other on the 192.168.0.0/24 subnet.

An advantage of using pipework over regular docker link is you can use static addresses for you containers and not have to worry about service discovery, or updating the links when bringing containers up or down.
For more advanced usage of pipework, including adding multiple interfaces and assigning physical interfaces to containers, I recommend reading the official Pipework documentation.
Pipework is nice for connecting containers on the same host, but what if we want to move to multiple hosts? In that case we’ll use a tool called…
Weave
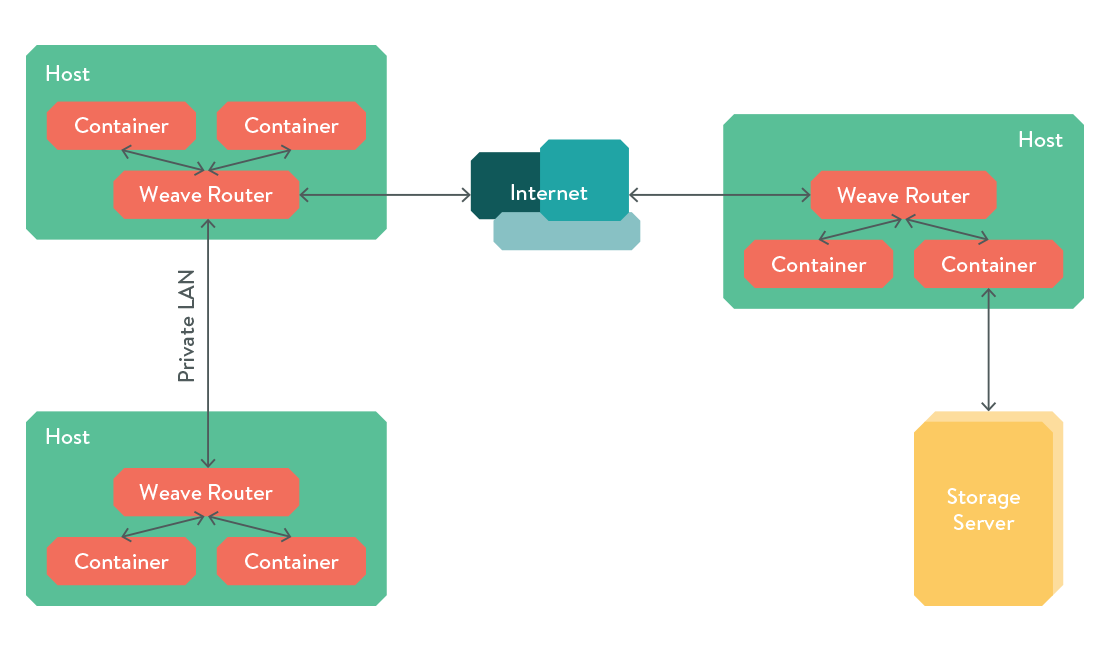
Weave creates a virtual network that can connect docker containers across multiple hosts as if they were all connected to a single switch. The weave router itself runs as a docker container, and can encrypt routed traffic for transmission over the internet. It can also enable connectivity between hosts that only have partial connectivity, by bouncing connections through a node both hosts can see. Here’s an example weave network:

To install weave, similarly to pipework, download their script:
sudo wget -O /usr/local/bin/weave \
  https://github.com/zettio/weave/releases/download/latest_release/weave
sudo chmod a+x /usr/local/bin/weave
Then launch the weave router on any number of hosts:
# First host
weave launch

# Second host
weave launch [ip.of.host1]
Now, wherever you would type docker run, replace it with weave run [CIDR]. For example, to recreate the same web stack above:
sudo weave run 192.168.0.1/24 -d --name nginx
sudo weave run 192.168.0.1/24 -d --name php php:fpm
sudo weave run 192.168.0.1/24 -d --name mysql -e MYSQL_ROOT_PASSWORD=mysecretpassword mysql
Note that you can run the above commands on any host in the weave network. You can also dynamically attach/detach containers from the weave network and add or remove hosts on the fly. For a more detailed breakdown of weave, check out their official Weave documentation.
Bonus: Docker Native IPv6
Pipework and weave are great, but they use private non routable IPv4 space. Since the release of Docker 1.5, the docker daemon has had support for Native IPv6. With sufficient firewall rules, you could use native IPv6 to connect your containers, over a private LAN or the internet.
In order to use IPv6, you’ll need a /64 subnet routed to each host, and to edit the docker daemon options
(/etc/default/docker on Ubuntu) to look something like this:
DOCKER_OPTS="--dns 8.8.8.8 --dns 8.8.4.4 --ipv6 --fixed-cidr-v6=2001:DB8:D0::/80"
Note: Docker needs at least a /80 subnet, as the address of the container ends with its MAC address.
After restarting the docker daemon (you may also need to destroy the docker0 bridge or simply reboot to prevent address errors), any container you start should have native IPv6 connectivity!
If you use router advertisements to configure IPv6, you may need to set net.ipv6.conf.eth0.accept_ra=2,
as per the official Docker documentation.